Apart from all the load-balancing concerns, caching is also a measure to improve the performance of the overall system. Caching can be on the Client side i.e. caches are used to avoid transferring the same data over the network repeatedly or they can be on the Server side i.e. caches are generally used to avoid making expensive database operations repeatedly to serve up the same content to lots of different clients. So, here we are to describe a way using REDIS to perform server-side caching and will follow client side caching later using SQUID.
TOPOLOGY of EXPERIMENT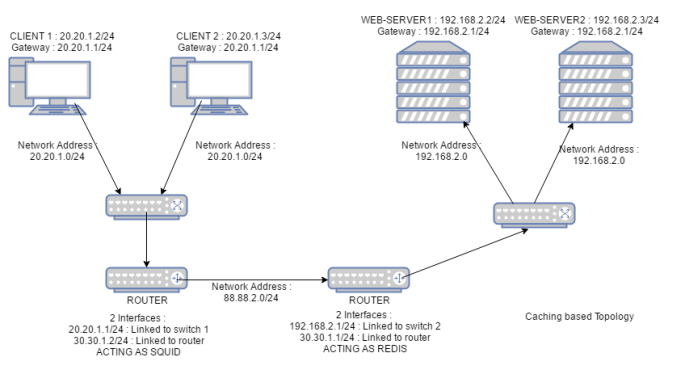
Now, as we are just focusing for our server side caching here and not towards client side caching so Router 2 should just be acting as a normal router and none client-side tools lie SQUID should be installed.
After the topology is created, we need to configure all static IP addresses. Once all the IP addresses are configured router’s should behave as forwarders i.e. making the system behave as a router and updating their routing table entries.
sudo sysctl -w net.ipv4.ip_forward = 1 [Making system behave as router]
Now, for the routing table entries following commands were issued :
sudo route add -net ip_address1 netmask 255.255.255.0 gw ip_address2

 SYSTEM          ip_address1          ip_address2
 ROUTER-A        192.168.2.0           30.30.1.1
 ROUTER-B         20.20.1.0            30.30.1.2
INTRODUCTION
REDIS is an open source key-value cache and storage system, also referred to as a data structure server for its advanced support for several data types, such as hashes, lists, sets, and bitmaps, amongst others. It also supports clustering, which makes it often used for highly-available and scalable environments. Our experiment will focus on REDIS server combining with PHP and working as as a Session-handler.
STEPS of EXPERIMENT
Step 1 — Install the Redis Server
The first thing we need to do is get the Redis server up and running, on our redis Droplet.As a general piece of security advice, you should only use PPAs from trusted sources.First, add the PPA repository by running:
sudo add-apt-repository ppa:chris-lea/redis-server
Now you need to update the package manager cache:
sudo apt-get update
And finally, let’s install Redis by running:
sudo apt-get install redis-server
Redis should now be installed on your server. To test the installation, try this command:
redis-cli ping
This will connect to a Redis instance running on localhost on port 6379. You should get a PONG as response.
Step 2 — Configure Redis to Accept External Connections
Using your favorite command line editor, open the file :
sudo gedit /etc/redis/redis.conf
and look for the line that contains the bind definition. You should add your private network IP address to the line, as follows:
bind localhost 192.168.2.1
Now you just need to restart the Redis service to apply the changes:
sudo service redis-server restart
Step 3 — Set a Password for the Redis Server
To add an extra layer of security to your Redis installation, you are encouraged to set a password for accessing the server data. We will edit the same configuration file from the previous step :
sudo vim /etc/redis/redis.conf
Now, un-comment the line that contains requirepass, and set a strong password:
sudo /etc/redis/redis.conf
requirepass yourverycomplexpasswordhere
Restart the Redis service so the changes take effect:
sudo service redis-server restart
Step 4 — Test Redis Connection and Authentication
To test if all your changes worked as expected, connect to the Redis service from inside the redis machine:
redis-cli -h 192.168.2.1
Output : 192.168.2.1:6379>
If you defined a password and now try to access the data, you should get an AUTH error:
192.168.2.1> keys *
Output : (error) NOAUTH Authentication required.
To authenticate, you just need to run the AUTH command, providing the same password you defined in the following file:
/etc/redis/redis.conf
Command to run : 192.168.2.1 > AUTH yourverycomplexpasswordhere
You should get an OK as response. Now if you run:
192.168.2.1> keys *
Output :(empty list or set)
This output just means your Redis server is empty, which is exactly what we expected, since the web-server is not yet configured to use this Redis server as a session handler.
Step 5 — Install the Redis Extension on the Web Server
The next steps should be executed on the web server. We need to install the PHP Redis extension, otherwise PHP won’t be able to connect to the Redis server. Following steps should be followed for the installation :
sudo apt-get update
sudo apt-get install php5-redis
sudo apt-get -y install apache2 mysql-server php5-mysql php5 libapache2-mod-php5 php5-mcrypt
Your web server should now be able to connect to Redis.
Step 6 — Set Redis as the Default Session Handler on the Web Server
Now we need to edit the php.ini file on the web server to change the default session handler for PHP. The location of this file will depend on your current stack. If you are unsure about the location of your main php.ini file, an easy way to find out is by using the function phpinfo(). Just place the following code in a file named info.php inside your web root directory:
sudo gedit /var/www/html/info.php
Place this code : <?php phpinfo(); ?>
When accessing the script from your browser as : localhost/info.php look for the row containing “Loaded Configuration File”, and you should find the exact location of the main php.ini loaded.
sudo gedit /path_to_file/php.ini
New value : session.save_handler = redis
Now should find the line containing session.save_path. Uncomment it and change the value so it contains the Redis connection string. The content should follow this format, all in one line:tcp://IPADDRESS:PORT?auth=REDISPASSWORD
session.save_path ="tcp://192.168.2.1:6379?auth=yourverycomplexpasswordhere"Restarting service : sudoservice apache2 restart
Step 7 — Test Redis Session Handling
For testing the REDIS setup, we will create a counter-program [php code] which shall persist the count until same session exists and the update happens from the server-side as caching is server-side in this experiment. We can observe that session id for a particular session get’s stored on to REDIS and easily clients can access cached data.[Session gets handled].
Create a file as test.php and store it as under :
sudo gedit /var/www/html/test.phpNow code a counter program and save the file.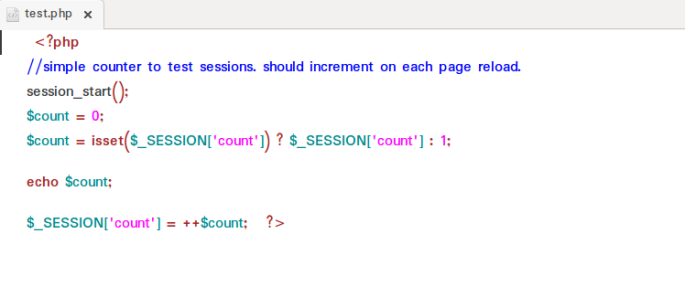
Now, we can open our browser on the client and try to fetch the file over the servers as : 192.168.2.1/test.php . As til the time session is not flushed updated data is coming from the server. But as soon as we flush the session data gets lost and again the counter gets to value 1. Redis is a powerful and fast key-value storage service that can also be used as session handler for PHP, enabling scalable PHP environments by providing a distributed system for session storage. We can check the session been stored for different clients over the REDIS as :
192.168.2.1> keys*
Output : 1) "PHPREDIS_SESSION:j9rsgtde6st2rqb6lu5u6f4h83"
Hope you liked the tutorial of Server-side caching tool helpful for Session management principles like we worked with HA-Proxy. Hope to cover some more interesting topics in the future. Till then balance your load and now cache it :).
